Posts

setup Chutzpah for running unit test

Image
Chutzpah is a open source javascript test runner that allows you to run unit test using qunit, jasmine, mocha, coffeescript and most importantly typescript. What in the world are you using Chutzpah for unit testing? Well, many teams started to writing their angularjs code in typescript. In this post, we're going to run our typescript unit test. First we need to setup our tool. 1. install Chutzpah test runner context menu extension - this allows you to right click on a file and runs a test. Life is easy. Restart  your visual studio and you're good to go. 2. You probably need to setup jasmine as your unit testing framework. For more information, please  following instruction here. Lets start with configuring our test runner and we're going to go with jasmine. Let's create new file called chutzpah.json and it should have the following contents :- Lets create a simple typescript test and you can right click on it to run a unit test. Debugging jasmine...

Ruby extension method

Ruby extension class is pretty simple. so i am just going to use a very simple example. Say i am going to extend Ruby's string class to include a method called "hello". Basically what it does is add a "hello" string to any string you might have. For example, myString = "'Jeremy" myString.hello() will get you "Jeremy hello there!". Here is  an example of our code.

Understanding Rails ActiveRecord association or relationship

Lets say we are trying to define a relationship user and product in ActiveRecord you need to :- 1. Define association on both sides of your model. For example, a user can have many products, you would in turn define relationship as follows :- We have the association parameter on both sides of our model. This also means product table will need a column called 'user_id'- which stores relationship to a specific user who owns this product. User model has a marker called 'has_many' Product model has a marker called 'belongs_to' - belongs_to also requires that you create a new column called user_id field in your database. Please note, that i use 'Product' and not the plural table name auto created by rails which always pluralized an object for you. 2. create a new database migration - it might involve creation of a new field for example user_id to hold data for an association. We might run the following command rails generate migration ad...

Securing rails activerecord with password cannot be any easier.

Lets say we have a user table that contains password and we would like to secure this from external access. I assume you already have a controller. So lets go ahead and create our model. 1. Run the following command rails g model User name email password_digest password_confirmation reputation 2. Run its serializer. rails g serializer User name email password_digest password_confirmation reputation 3. Next, lets modify our User ActiveRecord by adding a new field called 'has_secure_password', as shown in diagram below :- This is basically part of bcrypt (a.k.a blowfish encryption) implementation. Here are the specification a) In our database, we need a field called ' password_digest ' b) In our ActiveRecord, we need to specify ' has_secure_password ' 4. Next, we just need to run rake. rake db:migrate This ensure we have created the necessary table structure for our database. 5. We need to wire this up in our controller. Lets say...

Rails API creating a simple REST service

The first thing you need to do is 1. gem install rails-api 2. create your new rails api application by issuing the following command  rails-api new RailApi Here, we have just created a new application called RailApi. This has more or less the same structure with traditional rails based application 3. cd RailApi 4. Lets create our REST service'. We begin by creating a user controller and its model. rails g scaffold User name email If you goto db/migrate, you will see a file called user followed by some date. It should has the following contents :- 4. Add active_model_serializer to our gem file, as shown here. gem 'active_model_serializer' 5. And run "bundle install" 6. Create its serializer rails g serializer user name email This will generate the files as follows :- 7. Lets update our database by issuing rake command rake db:migrate If will go ahead and creates all the required table for our application 8. Lets start ...

Creating a simple babel compiler command line

As a continuation of the previous post, we can create a npm executable to compile our script which makes more sense. :) You can clone the code from here .  Please follow the installation instruction. For this task, we will be creating a custom babel plug-in. The main code resides in bin/hsc.js which uses node to open a file and pass to babel for further transformation. At line 11, we have a plugin keyword and we pass in our helloscript. This is how we tell babel to use our newly created plugin. If you look at helloscript.js it uses babel specification to traverse and locate a variable called 'a' and then attempt to convert it to ''total''. For our purpose, it resides in 'path,parent.id.name'. This is basically discovered via trial and error as I traced through the AST output. If you have problem zooming down on an expression, try to do a console.log(path), and slowly narrow down your PATH  by adding more element to the constraint for ex...

Creating your babel transpiler

Babel helps to convert ES2015 and Jsx to javascript. So it is a javascript to javascript - parser and code generator. In this tutorial i will show you a very simple tutorial working with babel main components namely : a) babylon - a parse which takes javascript code and convert into AST. b) babel-traverse - allow us to traverse through AST c) babel-generator - code generator Our goal is to convert this code let  a = 2 + 2 to let total = 2 + 2 Simple enough, so lets get started. 1. First we need to create a new folder. 2. Issue npm init and provide relevant information here 3. npm install --save babylon     npm install --save babel-generator 4. Create a file called index.js and it should contain the following codes :- Type node index.js to run this example You will see the output : { map: null, code: 'let total = 2 + 2;' } Noticed that we have converted "a" to total. To really understand how things tied together please read b...

Tabu search

Image
Tabu search is a combinatorial optimization problem whereby it tries to look for the best possible solution to a problem such as travelling salesman problem. When a best move is found it is added into a tabu. List of tabu is used to ensure search path / node is not traverse again. Tabu is remove with each iteration and only when it reaches zero, then search moves forward. This is to prevent search process to get stuck locally. For example, please take a look at diagram below. We have 5 location labeled (0, 1, 2, 3, 4) and each has an associated cost. Tabu search is able to tell us minimum cost associated with our chosen path. We use a 5x5 (2d) matrix to keep track of the cost associated with a edge / path / link. C# code for this TSP tabu search can be download  here . Also included in the code is hill climbing algorithm for solving tsp problem. The output looks like this Search done! Best Solution cost found = 9 Best Solution : 0 1 2 4 3 0

Distributing your npm package as an executable

Here are simple steps to setup your first npm package. You do not need to publish directly to npm repository instead you can push to git. First thing you gotta do is - setup github. a) Create a new repository and clone it to your local drive b) Execute 'npm init'. c) We will also use index.js as the default entry point. This means  we will create a file called "index.js" and it will host our modules, which might looks something like this. (Please note : You will need to add  #! /usr/bin/env node  as shown below, otherwise node will not be available.  :- d) Next, we need to edit our package.json and add the following "preferGlobal": false, "bin": {  "npmcalc": "./bin/index.js" This additional properties basically tells node that we are going to get an executable called npmcalc and source located in a file called index.js under bin folder. If you set 'preferGlobal' : true - you need to install npmca...

Publishing your own npm package to github

Here are simple steps to setup your first npm package. You do not need to publish directly to npm repository instead you can push to git. First thing you gotta do is - setup github. a) Create a new repository and clone it to your local drive b) Execute 'npm init'. c) We will also use index.js as the default entry point. This means  we will create a file called "index.js" and it will host our modules, which might looks something like this :- It just provide function to call and execute hello. d) Commit our code changes with git and then issue the following command to make master as the default branch in git. git push origin master e) Next, create any new folder and issue the following command to see if we can install our package correctly. npm install git://github.com/appcoreopc/hellonpm.git f) To verify, type the following on node command line. node and then let's call our library into action with the follow codes. var a  = require(...

Setup Typescript and React for your project with typings support

I know many might be asking about this, here's a quick guide for you to do it. 1. Issue the following command af npm init npm install -g typescript typings webpack npm install --save react react-dom // allowing interoperability between typescript and webpack npm install --save-dev ts-loader source-map-loader npm link typescript // get typings files for working with react. Warning this might give you error so used steps below - using tsd instead typings install --ambient --save react typings install --ambient --save react-dom --ambients tells typings to grab from DefinitelyTyped The command above was failing when i was working with it, so i used tsd. So go ahead and install tsd. npm install -g tsd Get react typings with the following command tsd install react tsd install react-dom  2. Add your  tsconfig.json  typescript configuration as follows :- 3. Create your first component using code as follow, please name it Hello.tsx (.t...

Setting up typescript in visual studio

Image
Create a typical Asp.Net 5 MVC applications. Vs2015 provide an excellent tool to work with typscript. a)  Create a file called package.json and use npm to load the required dependencies. b) Setup gulpfile.js c) Run gulp from Task Runner. 1.  Creating package json  Then you need to create file called package.json Package json should contains the followings contents : "devDependencies": {     "typescript": "^1.5",     "gulp": "^3.9.0",     "gulp-typescript": "^2.8.0",     "merge": "^1.2.0"   } 2  Creating gulp file  Goto Add->New Item->Client-> Gulp configuration as shown below :- After you added it, your gulp file should look like something below :- The thing to note here is that your ts file will be compiled into a .js file and placed in a folder called 'script' (as shown in line 12). , 3. Start your task runner by press Ctrl + Alt + B...

Javascript generator - iterator - or did i completed miss the idea out.

Nice .... good to know javascript supports iterator with a function * (asterisk). let index; // declares our iterator function which returns number from i to 9 const generatorFunction = function* () {     for (var i=0; i < 10; i++)     {         yield i;     } }; ////////////////////////////////////////////////////////////////////v // logs out output ////////////////////////////////////////////////////////////////////v for (index of generatorFunction ()) {     console.log(index); } output will be something like 0 1 2 3 4 5 6 7 8 9

Recapping my work signalR ....

Image
Working with signalR is really straigth forward, all you need to do is create your "Hub". Lets go configure your MVC project with the following command :- Next, lets get some concepts out the door. In signalR what we write eventually gets 'callable' by clients. One way of thinking about it is, public methods here is what client call. Whenever you call  this.Client.CLIENT_METHOD_TO_INVOKE (normally in hubs) you are invoking client side javascript function. Create a hub, as such and you're ready to test your SignalR apps. Step 1 :- At this point you would like to test out your code, by going to http://localhost:YOUR_PORT/SignalR/hubs and you will see javascripts rendered on your browser and your method is reflected here also. Somehow i have added some server side calls but it is not reflected here. :) Step 2 :- Modify your index.html and you're ready to go. So we start our hub (subscribe to a specific hub if you will) and t...

Creating your own Angular2 pipe.

Creating angular 2 pipe is easy. First we need to create our pipe component and then wire up into basic component. Lets get started. We are going to create a pipe component that takes a given number and add it up with a hard coded number like this. {{ 1 | addup: 10 }} 1 is the given number. 10 is a hard coded number. Lets create our pipe component. As you can see, we only need to decorate with @Pipe and implement PipeTransform and override "transform method" And lets use it in our component :- So we are importing our pipe "Addup" component in and then we need to inject our pipe in our component. Finally, use the | operator to apply our newly created operator. That's it. 

Angular2 Multiple component - Interaction using @Output and @Output

Lets say you're building multiple components in your control. There must be some interaction that goes on between main component and child components. Lets take a look how we can do that. Before proceeding further, it is also important to note that property binding - @Output is used to pass data from parent to child. Event binding @Output is to pass data from child to parent. We are going to build a component that retrieve a list of item from server and display it on a list on main component and when you click on an item, the child will render out more details. Next lets take a look at what our main component looks like :- As you can see we have actually used Angular2 directive here called - "stockdetails". Perhaps it is easier to see here :- [stock]  = is a directive and it must match @Input in our child component. When we select a item on the list, we update a variable call stockDetail and you can see we are trying to pass it into "stock" d...

Angular2 working with http

Things get more interesting when working with Http in Angular 2. You will need to include angularjs2 http script. Lets create a simple component that grab data from a rest service and renders on your component. Lets start with a component :- If you look at "ngOnInit", this is a directive that automatically gets call when your component loads or alternatively you can use ES6 "constructor". But there are not the same. ngOnInit allows child components to setup their events or initiate a get request. Our http request are called via getStock() and it uses reactive js to help to turn raw data into json. this.http.get("http://jsonplaceholder.typicode.com/posts/1").map((res: Response) => res.json()).subscribe( data => { this.info = new Article(data.id, data.title, data.title); }, err => console.log(err), () => console.log('done!')); }; As you can see, we use http.get() and then calls map to convert data int...

Angular tutorial - Setup environment.

Just went through John Papa AngularJs first look tutorial. I guess the best way to get people started is to get your environment ready.  Download from here. Make sure you have npm installed and run the following command :- npm install In this tutorial, we are going to use typescript as our primary development js language. Let's go create a really simple component. Angular2 requires @Component in your es6 module. Our view looks like this. It's pretty simple, all you need is a uniquely named html markup to specify where you need to load it. Next we need to create a separate file that binds our component together. That's all you need to create a simple component. Further reference:- What are the attribute / property available under @Component.? Well I'm glad you ask that question. You can get all the answer here . We have 1. viewProviders 2. template 3. templateUrl 4. styles 5. styleUrls 6. directives 7. pipes

android fragment internal notes

Image
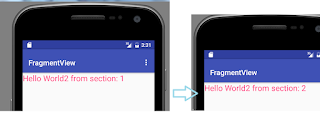
Android fragment is really awesome. somehow i kept on forgetting how to implement it after a few weeks down the road. :) Full source code for this is available in github . Simple Fragment  To create a basic fragment on your activity that looks like this :- Say this is a Fragment A and when you swipe, it goes to Fragment 2. To create this simple layout, you need a) ViewPager on your layout. b) Create a FragmentPagerAdapter c) Of course your fragments. d) Tied the Viewpager to Fragment Pager Adapter - There is only 3 liner to tied our fragments layout together as shown below :- Hopefully i won't forget about this implementation. Tab with Fragment  Let's have some fun with tab fragment. For this case, we need to do all above with one step to add a control in your AppBarLayout called TabLayout. So, please refer to step a to d above. Tying it all together with the follow code :-

javascript prototype and __proto__

Javascript prototype is pretty simple, once we have a hang of it. It is used to implement object inheritance. To get started, lets have a look at code below :-