Posts

Showing posts from 2024

helm - hosting your own chart using github pages
Image
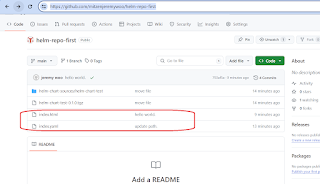
  I follow this url for instructions.  You can refer to my sample to get your bearing right.  https://github.com/mitzenjeremywoo/helm-repo-first This is where you should be: helm repo add myhelmrepo https://mitzenjeremywoo.github.io/helm-repo-first/ helm repo update myhelmrepo helm install myhelmrepo/helm-chart-test --generate-name     

argocd deploying helm application using command line and yaml

You can deploy argocd helm application using the command line. This is when you wanted to use a git repo and specify a path argocd app create helm-guestbook --repo https://github.com/argoproj/argocd-example-apps.git --path helm-guestbook --dest-namespace default --dest-server https://kubernetes.default.svc --helm-set replicaCount=2  Or you can use the following yaml to deploy your sample helm application hosted in a git. (Not from a helm repo - for that you need to specify chart name). This is solely for deploying from a git source that contains helm deployment. apiVersion : argoproj.io/v1alpha1 kind : Application metadata :   name : helm-guestbook   namespace : argocd spec :   project : default   directory :       recurse : true   source :     repoURL : https://github.com/argoproj/argocd-example-apps.git     path : helm-guestbook     helm :       releaseName : helm-guestbook       parameters :       - name : "replicaCount"         value : "2"       # valuesObject

argocd - deploying application to your cluster using argo command line.

  Setting up your argocd deployment context  argocd cluster add docker-desktop This setups a service account along with cluster role, cluster role bindings. Preparing your default application namespace context kubectl config set-context --current --namespace = argocd Given that our application resides in here:  https://github.com/argoproj/argocd-example-apps.git We can deploy our application using the following command.  argocd app create guestbook --repo https://github.com/argoproj/argocd-example-apps.git --path guestbook --dest-server https://kubernetes.default.svc --dest-namespace default

argocd - getting started installation

To get started with argocd, install it using the following command  kubectl create namespace argocd kubectl apply -n argocd -f https://raw.githubusercontent.com/argoproj/argo-cd/stable/manifests/install.yaml Download argocd cli from here . Configure your load balancer so that you can access argocd admin panel via localhost. Either this or you can use the port forward kubectl patch svc argocd-server -n argocd -p '{"spec": {"type": "LoadBalancer"}}' Setup user login credential (admin) - this will output the initial admin credentials to you. argocd admin initial-password -n argocd Next, you can test login using command line using or you can just hit the localhost with your browser.   argocd login localhost That's it - you managed to setup argocd.

keycloak 17 - offline token expiry times are dependent on session

  Due to a bug in keycloak 17, offline token required a session to be in the cache otherwise you will get unauthorize exception. I confirm that on the code level and then we have reported issue here as well.  https://github.com/keycloak/keycloak/issues/9299 A workaround would be to have a long running session - unfortunately. How long? That will depends on your use-case.

Online tool that can help with certificate formating

 This is a friendly tool that helps to format your certificate - appending those -----BEGIN CERTIFICATE-----' and '-----END CERTIFICATE-----' https://www.samltool.com/format_x509cert.php

c# no more boiler plate code for assigning value to properties

With c# record, no longer have to do manual instantiation or setting property when passing value as part of the constructor, for example, using the following  record WeatherForecast ( DateOnly Date , int TemperatureC , string ? Summary ) {     public int TemperatureF => 32 + ( int )( TemperatureC / 0.5556 ); } Is the 'almost' equivalent of public class WeatherForecast {     public int TemperatureC { get ; set ; }     public int Date { get ; set ; }     public string Summary { get ; set ; }     public WeatherForecast ( DateOnly date , int temperatureC , string ? summary )     {         Summary = summary ;         Date = date ;         TemperatureC = temperatureC ;     } }

AADSTS500033: There is an issue with the key, It has both x5t and x5c values, but they do not match

There's an issue with the jwt token being presented.  x5t: This refers to a value representing the thumbprint of a certificate used for authentication. A thumbprint is a unique identifier derived from the certificate. x5c: This refers to the certificate chain itself.  The error message is saying that the thumbprint (x5t) doesn't match the certificate (x5c) being presented.     

Azure devops docker service connection's service principal been removed

Image
  An issue with an Azure DevOps Docker service connection where the service principal is no longer available. As I have limited access to my organization AD, I am unable to carry out much investigation. I suspect the service principal has been removed. This is not the same as service principal expired where you can For expired service principal token Go to your Azure DevOps project settings and navigate to  Service connections . Locate the Docker service connection using a service principal. Click  Edit  on the connection. In the edit window, click  Verify . This attempts to refresh the token using the existing credentials. In my case, didn't even have a "verify" button - so i suspect this is more for Azure ARM Manager.  Or a variation of the workaround from stackoverflow link where you need to remove the secret before making meaningless update to re-generate the secret. To resolve it, i have to change my Docker service connection to use "Other" and setup the f

hotchoc calling API endpoint - working sample

  Here is a working sample for hotchoc graphql calling an endpoint. The sample code can be found here https://github.com/mitzenjeremywoo/graphql-api-integration To get started install swag tool  dotnet new tool-manifest To install nswag console cli tool into your local project  dotnet tool install NSwag.ConsoleCore --version 13.10 .9 Generate the swagger.json from your API endpoint. This file will be used for code generation later curl -o swagger.json http://localhost:5000/swagger/v1/swagger.json Next, generate your client API that will be consuming or calling your API dotnet nswag swagger2csclient /input:swagger.json /classname:TodoService /namespace:TodoReader /output:TodoService.cs And finally add newtonsoft.json library  dotnet add package Newtonsoft.Json The step above is for generating the client.  Integrate this client into your application code by following the code github code example.   You should be able to use Banana Cake Pop to run some graphql query against API. 

using netcat to test connectivity without dns resolution

Sometimes when troubleshooting DNS related issue, we would like to skip dns lookup and go straight to the target host. To do that we can use  nc -z -n IP_address port_number which can be quite handy.

powershell command for network

Test-NetConnection are useful in many ways To get detail information  Test-NetConnection -ComputerName www.contoso.com -InformationLevel Detailed   To check for TraceRoute - shows you the path to the destination server, in this case www.contoso.com. As traceroute operates on layer 3, it will be good to ensure connectivity is good, before proceeding to troubleshoot network connectivity at a higher level like DNS. (layer 7). Test-NetConnection -ComputerName www.contoso.com -TraceRoute Route diagnostics  Test-NetConnection -ComputerName www.contoso.com -DiagnoseRouting -InformationLevel Detailed or if you want to limit it to a specific network adapter (constraint interface) Test-NetConnection -ComputerName www.contoso.com -ConstrainInterface 6 -DiagnoseRouting -InformationLevel Detailed To get your adapter, you can run " Get-NetAdapter " Test-Connection is another useful utility. This is a ICMP request. ICMP works on layer 3 of the TCPIP and are not associated to a

hothoc - calling REST API endpoint troubleshooting

If you're getting the following error messages :-  "Could not deserialize the response body stream as System.Collections.Generic.ICollection`1[[TodoReader.WeatherForecast]' Or  "Unable to resolve service for type 'System.String' while attempting to activate service" These are indications that the conversion issue from JSON after calling the endpoint is not working. To troubleshoot this - NSWAG typically generate code that hides the actual error. You have to do some debugging and find out which type wasn't really being serialized successfully.  Or  "No service for type 'System.Net.Http.IHttpClientFactory' has been registered." This means you haven't register IHttpClientFactory to your service.

using NSwag console to generate code from OpenAPI endpoint

  To generate code from an Open API endpoint, you can use the nswag cli. The following are easy steps to do the code generations. The source here is swagger.json.  The /classname is the name of your class that will be generated and the same applies to  /namespace and  /output dotnet new tool-manifest dotnet tool install NSwag.ConsoleCore --version 13.10.9 curl -o swagger.json http://localhost:5199/swagger/v1/swagger.json dotnet nswag swagger2csclient /input:swagger.json /classname:PartnerService /namespace:ExternalAPI /output:PartnerService.cs For more options, please refer to this link here https://github.com/RicoSuter/NSwag/wiki/CommandLine/ce950c5aea7bf52a85ec6e517ad8ea96762181ed

install codegpt to vscode

Image
To install Codegpt to your vscode, first open up your vscode, then goto extension.  Then look for "CodeGpt" (the one with 1 million download) Install that extension.  Once you've done that, goto View -> Open View -> CodeGpt.  Ask away!   

hotchoc - graphql - getting started

  Create a dotnet core api project using cli. I am using dotnet 8. dotnet new webapi -n app  Then add the hotchoc packages  dotnet add package HotChocolate.AspNetCore Then you can add the necessary code to Program.cs  using HotChocolate ; using HotChocolate . AspNetCore ; var builder = WebApplication . CreateBuilder ( args ); builder . AddGraphQLServer ()     . AddQueryType < Query >(); var app = builder . Build (); app . MapGet ( "/" , () => "Hello World!" ); app . Run (); AddQueryType<Query> - this query is a class that contain simple code here. namespace app . model {     public class Query     {         public Book GetBook () =>         new Book         {             Title = "C# in depth." ,             Author = new Author             {                 Name = "Jon Skeet"             }         };     }     public class Book     {         public string Title { get ; set ; }         public Author Au

Mr Parker - terraform plan - complaining missing realm and openid client scope resources for Mr Parker provider

 When there's missing client especially when you restore a database and then run the pipeline, you will get this error - This has been fixed in a more recent version of the provider. A June 2023 version of the provider should work.  The only way to resolve this, assuming you're like me - unable to update, is the initialize your terraform and then run terraform state rm to remove the states accordingly. Please note, this would result in re-creation of the scopes or whatever resources that you're planning to remove.  Example command:  terraform state rm module.your_organization. keycloak_openid_client_ default_scopes.client_mobile_ edr_default_scopes

PSQL command to help with session termination

I find the following PSQL command quite useful for terminating session for a specific database in Postgres. Let say you want to alter the database name but there's tons of connections.  ALTER DATABASE "keycloak" RENAME TO "keycloakcurrent" So first you see which process is active in the database  SELECT * FROM pg_stat_activity where datname='keycloak' Then you issue multiple command to terminate the session.  SELECT pg_terminate_backend(9026) If you bump into an error whereby you need to be a member of pg_signal_backend, then you can use this command to grant yourself a member to that role called pg_signal_backend. GRANT pg_signal_backend TO psqladmin

container images - distroless vs chiseled

  Distroless Images  Think of Distroless Docker images as minimalists when it comes to traditional Docker images. They cut out all the extras and focus solely on the bare necessities your application needs to run. This means you won't find the usual operating system tools or shells inside. While they aren't entirely OS-free, they only pack the essential components needed for the operating system to function at its most basic level. Chiseled Images Traditional container images are bloated with unnecessary components, hindering performance and security. Chiseled containers address this by including only the essentials, leading to significant size and security improvements. Cons:  Limited container images for dotnet and java.

kubecon and kubecon euro 2024

Time to get excited again   https://www.youtube.com/watch?v=1u5LtsJqyrA&list=PLj6h78yzYM2N8nw1YcqqKveySH6_0VnI0

dapr getting started

To install dapr in a kubernetes environment  dapr init -k Then fire up the dashboard using  dapr dashboard -k

kubevela - the server could not find the requested resource (post definitionrevisions.core.oam.dev)

If you try to install kubevela on k1.29, you would get error. The reason for this is kubevela is only supported in v1.19 to v1.26.  https://github.com/kubevela/kubevela/issues/6497 I have tried using vela cli and helm approach - it is still failing for me.  Currently, the issue above is open and hopefully get fixed at some point.  

aws cloudformation - good introductory material

 https://catalog.workshops.aws/cfn101/en-US/basics

keycloak client secret rotation

Image
 Client secret rotation is disabled by default but you can turn it on with the following command:- docker run --name mykeycloak -v c:\work\keycloak\conf:/opt/keycloak/conf -p 5000:8080 -e KEYCLOAK_ADMIN=admin -e KC_METRICS_ENABLED=true -e  KC_FEATURES= client-secret-rotation  -e KC_HEALTH_ENABLED=true -e KEYCLOAK_ADMIN_PASSWORD=admin quay.io/keycloak/keycloak start-dev -cache-config-file=cache.xml Next is about configuring your keycloak. Goto Realm Settings -> Client Policies -> Profile.  Everything you need to do will be in this page. So we will  1. Create profile (Profiles tab) 2. Create policies (Policies tab)  Now that we have our bearing right, go ahead create a Profile by clicking on "Create client profile" and that brings you to a new page. Provide a name and click "Save". Next you will see a screen below - click on "Add Executor". Then choose "secret-rotation" Configure your secret rotation configuration and then click 'Save'

AADSTS90061: Request to External OIDC endpoint failed.

 This error often comes up and if you google it, you will hit this page. https://azure.github.io/azure-workload-identity/docs/troubleshooting.html#aadsts90061-request-to-external-oidc-endpoint-failed To give an idea what the error message means, " the OIDC issuer endpoint is not exposed to the internet or is inaccessible "" - This simply means Microsoft Azure AD is trying to hit the endpoint you've provided in the issuer section.  So it is not just a static value that you provided in your federated credential and provided the necessary field in your JWT.  The endpoint will be access and jwks key checked against the token you have provided.  SERVICE_ACCOUNT_ISSUER - is the issuer endpoint you specified/provided in your JWT. This must be publicly accessible along with the following endpoint curl ${SERVICE_ACCOUNT_ISSUER} /.well-known/openid-configuration curl ${SERVICE_ACCOUNT_ISSUER} /openid/v1/jwks

azure servie bus - quick way to get your metrics

  Goto your service bus -> Workbook -> Select the request tab -> You can see server errors, throttling without doing much clicking.  

auth0 - terraforming your client with Auth0 terraform provider

 You can terraform your client and their configurations. please check out  https://github.com/auth0/terraform-provider-auth0?tab=readme-ov-file

auth0 - how to revoke offline token for a user

Goto Dashboard -> User -> Select your the user and under Devices ->  Unlink the token tied to your client 

postman - exchanging token using refresh token example

Image
  It is quite common to exchange for a new set of token with new expiry times in an oauth application. You typically need the following setup as shown here. Before you can do this, you must have logged in gotten your 1st set of access token / refresh token - and it has scope to offline_access. Then in the POST endpoint below (first red rectangle) - provide your token endpoint.  Then provide the setup shown below:  You should get a new sets of token  I guess altho client in auth0 are protected with a secret - I can get away without providing client_secret.  Altho for the record, i did setup the client as a SPA application which is an open client and can't hold password.  If you prefer the curl  curl --location 'YOUR-TOKEN-ENDPOINT' \ --header 'Content-Type: application/x-www-form-urlencoded' \ --header 'Authorization: Bearer YOUR-ACCESS-TOKEN' \ --header 'Cookie: did=s%3Av0%3A699f7290-f0b8-11ee-b580-9d803a0bd79c.3XA2ahamJPcJWt7b35fbqtFq%2FqoXEKWSHGigUkAug

auth0 - getting access token / refresh token in your jwt using react-sdk

Image
  To get your refresh_token from auth0 - we need just need to provide a offline_access scope for react sdk as shown in the code below:- import { Auth0Provider } from '@auth0/auth0-react' ; const root = ReactDOM . createRoot (   document . getElementById ( 'root' ) as HTMLElement   );   root . render (     < React.StrictMode >         < Auth0Provider         domain = "your-domain.auth0.com"         clientId = "your-client-id"         authorizationParams = { {           redirect_uri : window . location . origin ,           audience : "https://your-api-identifier" ,           scope : "offline_access"         } }         >           < App />         </ Auth0Provider >     </ React.StrictMode >     ); Right after you login, you would be able to see refresh token being provided in your jwt. From this point onwards you can exchange that for a fresh new set of access token to keep you logged in. Fr

istio - debugging route for postgres that resolve to kubernetes external name service

Bump into an issue where we found out outgoing port for postgres 5432 are forwarded to a k8s external name service.  It wasn't clear to us as this service resides in another namespace. To troubleshoot, how istio do the routing I use  istioctl ps listerners <pod-name> -n your-nanespace  Sure enough detected that: 0.0.0.0    ALL  5432 ---> External-serviceName.Other-Namespace.svc.kubernetes.local  So how do you ensure istio route these to the right postgres instance in Azure or AWS, You need a serviceEntry .  apiVersion : networking.istio.io/v1beta1 kind : ServiceEntry metadata :   name : external-svc-postgres   namespace : my-namespace spec :   hosts :   - mypostgress.database.azure.com   exportTo :   - "."   # Ensure this is not available to other namespace.   location : MESH_EXTERNAL   ports :   - number : 5432     name : mypostgres     protocol : TCP   resolution : DNS

auth0 changing the token expiry_in timings

Image
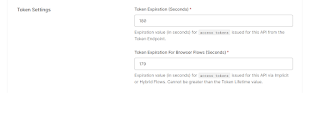
  In auth0 you can configure different expiry time for your token. To get a token, your say react sdk would call an API endpoint in your domain. This API is what you configure under Applications -> APIs.  Each API can have a different expiry timings and you just need to make sure you call the right API with the right expiry settings.  For example, in the code snippet below, I am calling my API with a unique identifier below Given that it has a expiry of 180 seconds, the token return would have the same expiry time too.   try {         const accessToken = await getAccessTokenSilently ({           authorizationParams : {             audience : `https://myend` ,             scope : "read:current_user" ,           },         }); My API expiry time configuration 

react error -Type 'boolean' is not assignable to type 'ReactElement'

  The error popping up due to this line of code here which will - as typescript indicated returns boolean or jsx element.  { isAuthenticated && (       < div >         < img src = { user !. picture } alt = { user !. name } />         < h2 > { user !. name } </ h2 >         < p > { user !. email } </ p >       </ div >     ) To resolve this - thanks to this link here . I use react fragment approach - which i deem to be easier.   return (             <> { isAuthenticated && (       < div >         < img src = { user !. picture } alt = { user !. name } />         < h2 > { user !. name } </ h2 >         < p > { user !. email } </ p >       </ div >     ) } </>   );

auth0 - figuring out your oidc endpoints

Image
  To figure out what are your oidc endpints like /token, /auth, you can go to the Your login portal Dashboard ->  Application -> Select your intended application -> Advance Settings -> Then look for Endpoint tab as shown in the tab below :-

auth0 - code flow and configuring spa application with custom refresh_token times

Image
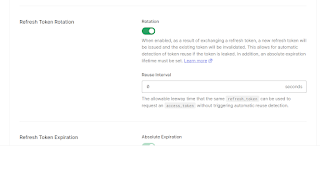
To configure your SPA application go to your Auth0 dashbaord -> Create Application -> Provide a name ->  Choose technology -> select React Ensure you have configure - "Allowed callback url" - for me - I have set it to https://localhost:3000 which Auth0 validation check does not approves although it does allow me to save, for now. Ensure Refresh Token Rotation is configured - as shown below: Next, we will use postman to get a refresh token  Ensure you have configure  - client id - client secret - grant type - code  - auth endpoint -  https://your-domain.auth0.com/authorize - token endpoint -  https://your-domain.auth0.com/oauth/token - scope - offline_access When you hit "Get new access token" - your token will get a refresh token on top of access_token - as shown below:  You can see postman enable the refresh command for you - so you can trigger refresh token anytime How do you configure a custom expiry_in token time?  Unfortunately this is going to be a