Posts

Showing posts from April, 2024

Keycloak setting UMA - Error: Account is not fully set up

Image
While trying to setup keycloak client UMA - I am gettting this strange error - 'Account is not fully set up' in keycloak. It was working fine yesterday until it didn't. Wondering what is the causes of this, I looked at the logs and saw 2024-04-30 18:23:22,147 WARN  [org.keycloak.events] (executor-thread-261) type="LOGIN_ERROR", realmId="b6572e7b-f503-4189-a1fd-fa4c2a62e697", clientId="mycustomers", userId="null", ipAddress="172.17.0.1", error="resolve_required_actions", auth_method="openid-connect", grant_type="password", client_auth_method="client-secret", username="member@service-team" Then I proceed to assign a dummy role to my users - in this case 'Customer A' role.  After that, I retry my post  grant_type :  " password "   username :  " member@service-team "   password :  " password123 "   scope :  " email profile " Then

jwks checking and making sure you key is valid

Image
Let's say you're given a JWKS endpoint and you would like to check if the thumbprint and the certificate matches. How to validate JWKS x5t and x5c Get the thumbprint  Given the following PEM certificate  -----BEGIN CERTIFICATE----- MIIDATCCAemgAwIBAgIJONNUmCmK7I XsMA0GCSqGSIb3DQEBCwUAMB4xHDAa BgNVBAMTE2tlcHVuZ2FwcC5hdXRoMC 5jb20wHhcNMjAwMzExMjEyMjU5WhcN MzMxMTE4MjEyMjU5WjAeMRwwGgYDVQ QDExNrZXB1bmdhcHAuYXV0aDAuY29t MIIBIjANBgkqhkiG9w0BAQEFAAOCAQ 8AMIIBCgKCAQEAq0elaWKPAE845DDF 3m6oMc6pKqEvqAU4fBPU5YFEMqV59S ZZJ8ovmBdkktfXCyy6/QNTnFI+ JSZX0LeLvh3PpHKF1T0xdXkP9Q8KdP 8NeQkmckYdc2TX1dfERxfHR0tK6R6L 1CK6xohEsxcIXA8NdfHSUCnT+ cbSFeDnb0/ pUkIhcXOGVkrijoYHFBFhhISlG6cRh e/NTRPbwyo7YYGr/ IC45xSz4hrCZt8Qx1x/ oIdDfPakOiLw5ThxVIh8GUaZYpz3DP jGfigOaOYFd8l+ i1aGyJHfT86mtI5qwP5BGMCKcUbn++ 6do+ EfGirM6tMJ9Pik5ra3DYr4q305Fgzy XQIDAQABo0IwQDAPBgNVHRMBAf8EBT ADAQH/ MB0GA1UdDgQWBBQaBvGaWIDv/ axzCxtYKOACgR63vzAOBgNVHQ8BAf8 EBAMCAoQwDQYJKoZIhvcNAQELBQADg gEBAI3RPqveXDDKUEoO6aqv5AYOK5Z FswdQdiUMsO+ S8Aq

argocd auto sync policy - using selfHeal as an example

In my example, I am going to sync my git source code to kubernetes cluster. Whenever i push my changes, this trigger a deployment in 180s (3 minutes - default) This can be done via selfHeal as shown below:- apiVersion : argoproj.io/v1alpha1 kind : Application metadata :   name : helm-guestbook   namespace : argocd spec :   syncPolicy :       automated :         selfHeal : true   project : default   # directory:   #     recurse: true   source :     repoURL : https://github.com/mitzenjeremywoo/argocd-example-apps.git     path : helm-guestbook     helm :       releaseName : helm-guestbook       valueFiles :       - values-production.yaml         destination :     server : "https://kubernetes.default.svc"     namespace : default To change the default sync you can edit argocd-cm in the argocd namespace. Refer to the link here for more information . The sync operation can be slightly complicated but make sense to me. More about to sync or not to sync, please refer to this link her

argocd - Unauthenticated desc = invalid session: Token is expired

Bump into this issue and to resolve it, try logging back into the server again:- argocd login localhost Then try to run some argocd command such as  argocd app history argocd/helm-guestbook

argocd Application referencing project default which does not exist

If you get this error, please try to check if this exist   kubectl get AppProject -A If you get empty, then you can create it using the following yaml # this manually creates the default project apiVersion : argoproj.io/v1alpha1 kind : AppProject metadata :   name : default   namespace : argocd spec :   sourceRepos :     - '*'   destinations :     - namespace : '*'       server : '*'   clusterResourceWhitelist :     - group : '*'       kind : '*'  

helm - hosting your own chart using github pages

Image
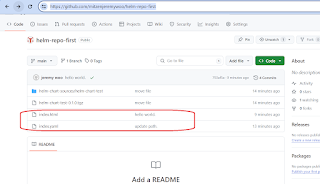
  I follow this url for instructions.  You can refer to my sample to get your bearing right.  https://github.com/mitzenjeremywoo/helm-repo-first This is where you should be: helm repo add myhelmrepo https://mitzenjeremywoo.github.io/helm-repo-first/ helm repo update myhelmrepo helm install myhelmrepo/helm-chart-test --generate-name     

argocd deploying helm application using command line and yaml

You can deploy argocd helm application using the command line. This is when you wanted to use a git repo and specify a path argocd app create helm-guestbook --repo https://github.com/argoproj/argocd-example-apps.git --path helm-guestbook --dest-namespace default --dest-server https://kubernetes.default.svc --helm-set replicaCount=2  Or you can use the following yaml to deploy your sample helm application hosted in a git. (Not from a helm repo - for that you need to specify chart name). This is solely for deploying from a git source that contains helm deployment. apiVersion : argoproj.io/v1alpha1 kind : Application metadata :   name : helm-guestbook   namespace : argocd spec :   project : default   directory :       recurse : true   source :     repoURL : https://github.com/argoproj/argocd-example-apps.git     path : helm-guestbook     helm :       releaseName : helm-guestbook       parameters :       - name : "replicaCount"         value : "2"       # valuesObject

argocd - deploying application to your cluster using argo command line.

  Setting up your argocd deployment context  argocd cluster add docker-desktop This setups a service account along with cluster role, cluster role bindings. Preparing your default application namespace context kubectl config set-context --current --namespace = argocd Given that our application resides in here:  https://github.com/argoproj/argocd-example-apps.git We can deploy our application using the following command.  argocd app create guestbook --repo https://github.com/argoproj/argocd-example-apps.git --path guestbook --dest-server https://kubernetes.default.svc --dest-namespace default

argocd - getting started installation

To get started with argocd, install it using the following command  kubectl create namespace argocd kubectl apply -n argocd -f https://raw.githubusercontent.com/argoproj/argo-cd/stable/manifests/install.yaml Download argocd cli from here . Configure your load balancer so that you can access argocd admin panel via localhost. Either this or you can use the port forward kubectl patch svc argocd-server -n argocd -p '{"spec": {"type": "LoadBalancer"}}' Setup user login credential (admin) - this will output the initial admin credentials to you. argocd admin initial-password -n argocd Next, you can test login using command line using or you can just hit the localhost with your browser.   argocd login localhost That's it - you managed to setup argocd.

keycloak 17 - offline token expiry times are dependent on session

  Due to a bug in keycloak 17, offline token required a session to be in the cache otherwise you will get unauthorize exception. I confirm that on the code level and then we have reported issue here as well.  https://github.com/keycloak/keycloak/issues/9299 A workaround would be to have a long running session - unfortunately. How long? That will depends on your use-case.

Online tool that can help with certificate formating

 This is a friendly tool that helps to format your certificate - appending those -----BEGIN CERTIFICATE-----' and '-----END CERTIFICATE-----' https://www.samltool.com/format_x509cert.php

c# no more boiler plate code for assigning value to properties

With c# record, no longer have to do manual instantiation or setting property when passing value as part of the constructor, for example, using the following  record WeatherForecast ( DateOnly Date , int TemperatureC , string ? Summary ) {     public int TemperatureF => 32 + ( int )( TemperatureC / 0.5556 ); } Is the 'almost' equivalent of public class WeatherForecast {     public int TemperatureC { get ; set ; }     public int Date { get ; set ; }     public string Summary { get ; set ; }     public WeatherForecast ( DateOnly date , int temperatureC , string ? summary )     {         Summary = summary ;         Date = date ;         TemperatureC = temperatureC ;     } }

AADSTS500033: There is an issue with the key, It has both x5t and x5c values, but they do not match

There's an issue with the jwt token being presented.  x5t: This refers to a value representing the thumbprint of a certificate used for authentication. A thumbprint is a unique identifier derived from the certificate. x5c: This refers to the certificate chain itself.  The error message is saying that the thumbprint (x5t) doesn't match the certificate (x5c) being presented.     

Azure devops docker service connection's service principal been removed

Image
  An issue with an Azure DevOps Docker service connection where the service principal is no longer available. As I have limited access to my organization AD, I am unable to carry out much investigation. I suspect the service principal has been removed. This is not the same as service principal expired where you can For expired service principal token Go to your Azure DevOps project settings and navigate to  Service connections . Locate the Docker service connection using a service principal. Click  Edit  on the connection. In the edit window, click  Verify . This attempts to refresh the token using the existing credentials. In my case, didn't even have a "verify" button - so i suspect this is more for Azure ARM Manager.  Or a variation of the workaround from stackoverflow link where you need to remove the secret before making meaningless update to re-generate the secret. To resolve it, i have to change my Docker service connection to use "Other" and setup the f

hotchoc calling API endpoint - working sample

  Here is a working sample for hotchoc graphql calling an endpoint. The sample code can be found here https://github.com/mitzenjeremywoo/graphql-api-integration To get started install swag tool  dotnet new tool-manifest To install nswag console cli tool into your local project  dotnet tool install NSwag.ConsoleCore --version 13.10 .9 Generate the swagger.json from your API endpoint. This file will be used for code generation later curl -o swagger.json http://localhost:5000/swagger/v1/swagger.json Next, generate your client API that will be consuming or calling your API dotnet nswag swagger2csclient /input:swagger.json /classname:TodoService /namespace:TodoReader /output:TodoService.cs And finally add newtonsoft.json library  dotnet add package Newtonsoft.Json The step above is for generating the client.  Integrate this client into your application code by following the code github code example.   You should be able to use Banana Cake Pop to run some graphql query against API. 

using netcat to test connectivity without dns resolution

Sometimes when troubleshooting DNS related issue, we would like to skip dns lookup and go straight to the target host. To do that we can use  nc -z -n IP_address port_number which can be quite handy.

powershell command for network diagnostics

Image
Test-NetConnection are useful in many ways To get detail information  Test-NetConnection -ComputerName www.contoso.com -InformationLevel Detailed   To check for TraceRoute - shows you the path to the destination server, in this case www.contoso.com. As traceroute operates on layer 3, it will be good to ensure connectivity is good, before proceeding to troubleshoot network connectivity at a higher level like DNS. (layer 7). Test-NetConnection -ComputerName www.contoso.com -TraceRoute Route diagnostics  Test-NetConnection -ComputerName www.contoso.com -DiagnoseRouting -InformationLevel Detailed or if you want to limit it to a specific network adapter (constraint interface) Test-NetConnection -ComputerName www.contoso.com -ConstrainInterface 6 -DiagnoseRouting -InformationLevel Detailed To get your adapter, you can run " Get-NetAdapter " Test-Connection is another useful utility. This is a ICMP request. ICMP works on layer 3 of the TCPIP and are not associated to a